Peanut Butter Banana Chocolate Chip Nice-Cream

I first came to know the magic of frozen bananas years ago as a cold treat after a long run on a hot and humid day. When given the freezer treatment, both the sweet and creamy aspects of bananas shine and they are transformed from fruit into dessert.

More recently, I’ve come to know what’s referred to as banana nice-cream. Frozen bananas, peanut butter, a little unsweetened almond milk, a splash of vanilla, and some mini chocolate chips blend together into something you’d swear was actual ice cream. And other than the chocolate chips, which are optional, there’s no added sugar. Totally plant-based, healthy, but eats like a decadent delight when you really need dessert.

You can play with the flavors. Instead of peanut butter, almond butter would be good, with a bit of almond extract in place of the vanilla. Instead of chocolate chips, mix in some chopped fruit and/or nuts. For those with nut allergies, sunflower seed butter is a delicious option.

I make this delicious indulgent-tasting dish in my Vitamix, but a food processor would work too. At first it’s the texture of soft-serve ice-cream and becomes as firm as regular ice-cream after about 4 hours in the freezer. If frozen longer, it gets pretty hard, so it’s best to take it out of the freezer and let sit on the counter for a bit before scooping.

If you’d like, add your favorite ice-cream toppings, then sit back and savor this rich, creamy treat there’s no need to feel guilty about. Enjoy!


Banana Peanut Butter Chocolate Chip Nice-Cream

Adapted from this Fit Foodie Finds recipe

2 frozen bananas (I peel my bananas, place in plastic wrap and freeze until solid), sliced

1/4 cup peanut butter

1/2 cup unsweetened almond milk

1/2 teaspoon pure vanilla extract

1/3 cup mini chocolate chips

Place bananas, peanut butter, almond milk, and vanilla in a high-speed blender or food processor. Blend until smooth and creamy, the consistency of soft-serve ice-cream. Add chocolate chips and blend until just mixed in.

Eat right away as a soft-serve treat or place into a container with tight-fitting lid and freeze for 4 hours until it becomes firm like regular ice-cream. If you freeze it longer, it will probably need get too hard to scoop, so it will need to sit on the counter a while to soften a bit.

Top with your favorite ice-cream toppings. Makes about 2 servings and is easily doubled.

Fusilli alla Vodka with Basil, Parmesan and Garlic Breadcrumbs


We just discovered the deliciousness that is pasta in vodka sauce. I’ve seen it on restaurant menus, but finally got the itch to make it after two of my favorite food bloggers and recipe creators posted their versions recently, Sarah Nasello and The Smitten Kitchen.

Most of the versions I’ve seen are vegetarian, but a couple, like Sarah’s, add a small amount of pancetta, which must add a lovely flavor. And all the recipes included heavy cream. Because I eat vegetarian, obviously, the pancetta was out, and, also, because I try to eat heart healthy as often as possible, I wanted to omit the saturated fat laden cream.

I have found an amazing substitute for heavy cream and it’s super simple. Raw cashews soaked in water overnight, then drained and blended at high speed with water and a pinch of salt. There you have it, plant-based cream with no unnatural ingredients, using nuts that are vitamin and mineral rich, and most importantly, make a rich and satisfying replacement.

And what does the vodka add to the dish? It’s hard to put my finger on it, but according to the food lab folks at Serious Eats, “Vodka does alter the flavor of the sauce in a pleasing way. It adds a touch of heat and a bit of a sharp bite that help balance out the sweetness of the tomatoes and the cream. Is it absolutely necessary? No, but vodka sauce just wouldn’t be, well, vodka sauce without it.”

Often made with penne, or, like the Smitten Kitchen’s, with rigatoni, I used fusilli, because that’s what I had on hand. Any of the three will work equally well.

To add texture, I sprinkled the finished dish with crunchy, garlicky breadcrumbs, along with fresh basil and additional parmesan. It all came together as a wonderful full meal, with the only drawback being there were no leftovers. Enjoy!

Fusilli alla Vodka

Adapted from this and this Bon Appetit recipe

2 tablespoons unsalted butter, divided

1 tablespoon extra-virgin olive oil

1 shallot, finely chopped

1 clove garlic, peeled and grated

¼ cup tomato paste

2 tablespoons vodka

½ cup cashew cream (recipe follows; it will probably make more than you need)

½ teaspoon crushed red pepper flakes

Salt and freshly ground black pepper

8 ounces fusilli pasta, preferably whole wheat (I used the Trader Joe’s Organic Whole Wheat Fusilli); penne or rotini would also work

½ ounce finely grated parmesan cheese, plus more for serving

1/8 cup chopped fresh basil

Garlicky Panko Breadcrumbs, for topping (recipe follows)

Heat 1 tablespoon butter and olive oil in large skillet over medium. Add shallots and garlic. Cook, stirring occasionally, until softened, about 3-5 minutes. Add tomato paste and cook, stirring occasionally, until paste is brick red and starts to caramelize, about 5 minutes. Add vodka and cook, stirring constantly, until liquid is evaporated, about 2 minutes. Add cashew cream and red pepper flakes and stir until well blended. Season with salt and pepper, to taste; remove from heat.

Meanwhile, cook pasta in a large pot of well-salted boiling water, stirring occasionally, until al dente. Drain, reserving ¾ cup pasta cooking liquid. Add pasta to skillet with sauce, along with remaining tablespoon butter and ¼ cup pasta cooking liquid. Cook over medium-low heat, stirring constantly and adding more pasta cooking liquid, as needed, until butter has melted and a thick, glossy sauce has formed, about 2 minutes. Season with salt and pepper and add ½ oz. parmesan, tossing to coat.

Divide pasta among bowls, topping with breadcrumbs, basil, and extra parmesan. Makes 2 generous servings as a main course, 4 as a side dish.


Cashew Cream

½ cup raw cashews

Water

Pinch of salt

Place cashews into a small bowl and cover with water. Let stand 8 hours or overnight. Drain cashews and place into a high-speed blender. Add 1/4- to 1/3 cup water. Blend about 2 minutes, stopping once to scrape down sides of blender. Check for thickness and add more water if necessary. You want this to be the thickness of heavy cream. Add a pinch of salt and blend another minute. Store in an air-tight container in the fridge for up to 5 days.


Garlicky Panko Breadcrumbs

1 tablespoon butter

1 large garlic clove, peeled and lightly smashed

½ cup panko breadcrumbs

Pinch of salt

Cook butter and garlic over medium-low heat, swirling until garlic is fragrant and foaming subsides, about 2 minutes. Add panko and stir to coat evenly. Cook, stirring often, until breadcrumbs are golden brown, about 4 minutes. Season with salt.

Easy Homemade Bread Bowls


Yesterday I had plans to make potato soup for dinner. After searching recipes online and paging through some cookbooks the last couple evenings, I came up with a game plan. Then, early afternoon, when checking email, I saw a post that mentioned homemade bread bowls. What great timing!

I don’t think I’ve ever had anything in a bread bowl before even though I’ve seen them filled with dip at parties and on restaurant menus filled with soup or salad. But coming across a recipe to make them from scratch got my attention. And it was from Sally’s Baking Addiction, a very trusted source for all things baked.

With not a lot of hands-on time required and only one full rise, it looked doable to have these ready in time for dinner. With only a couple short breaks from my work-from-home workday, they were ready and cooling before I even started on the soup, plus, the house smelled amazing.

Following the recipe, the only change I made was to use instant yeast in place of active-dry. That made for a really quick rise to double in size, about 35 minutes. And the second rise after you form the dough balls is only the time it takes to preheat your oven. The egg wash gives the bread bowls that beautiful shiny golden exterior and the interior is a perfectly soft, heavenly texture that you only get with homemade.

Fill with your favorite soup, salad, or dip, take a deep breath, relax, and enjoy! It’ll taste even better if it’s cold and snowy where you are.


Easy Homemade Bread Bowls

From Sally’s Baking Addiction

4 and ½ teaspoons either instant yeast or active-dry yeast (2 packets)

2 and ¼ cups (540 ml) warm water (105-115 degrees F.)

2 teaspoons granulated sugar

2 teaspoons salt

2 tablespoons extra-virgin olive oil

6 cups (780 grams) bread flour, plus more for hands and surface

Egg wash: 1 large egg beaten with 1 tablespoon milk (any kind of milk, including almond or soy)

Pour the warm water over yeast in the bowl of a stand mixer fitted with a dough hook. If you don’t have a stand mixer, a regular large mixing bowl will work. Whisk together and allow to sit for 10 minutes, until foamy.

If you do not have a stand mixer, mix by hand in this step. With the stand mixer running on low speed, add the sugar, salt, olive oil, and 4 cups of the bread flour. Mix on low speed for 1 minute, then add remaining 2 cups of flour. Mix on low speed for 5-6 minutes. The dough should be thick, yet soft, and only slightly sticky. It should pull away from the sides of the bowl as it mixes. If it’s too sticky, add more flour, 1 tablespoon at a time, until it pulls away from the sides of the bowl.

Turn dough out onto a lightly floured surface and form it into a ball. Grease the bowl you mixed the dough in with a little olive oil. Return ball of dough to the bowl and turn it over once to oil the top. Cover the bowl with plastic wrap and place it in warm area to rise until doubled in size, 45-90 minutes, depending on whether you used instant or active dry yeast.

Once doubled in size, punch down the dough to release any air bubbles. Remove dough from the bowl onto a lightly floured surface. Punch down again. Using a sharp knife or bench scraper, cut the dough into 6 equal pieces. Form each piece into a ball.

Line 2 large baking sheet with parchment or silicone baking mats. Place 3 dough balls onto each sheet. Cover lightly and set aside to rest as your oven preheats.

Preheat oven to 400 degrees F. Just before putting in the oven, brush the dough balls with the egg wash. If desired, using a sharp knife, score an X into the tops of each (I did this on 5 of the 6 and it looks pretty, but isn’t a necessity).

Bake for 30 minutes or until golden. About halfway through, rotate the pans from top to bottom and rotate each 180 degrees, for even baking. Let cool on pan or cooling rack. The bowls will be easier to cut if they have cooled somewhat.

For serving, cut a large round off the top of each bread bowl. Scoop out the center (either save to dunk in soup, or reserve for another use). Fill with soup, stew, or salad. Leftover bread bowls can be stored covered, at room temperature for a couple days, or wrapped and frozen for several months (bring to room temperature before serving). I wasn’t able to eat an entire bread bowl (my husband, however, found it easy to do), so I refrigerated the uneaten portion and enjoyed it with soup (in a regular bowl) the next day—don’t let any of that delicious bread go to waste! Make 6 bread bowls.

Panettone Muffins


A few weeks ago, I ordered a new-to-me ingredient from King Arthur Baking Company, Fiori di Sicilia. It’s a blend of citrus and vanilla with a subtle floral aroma that reminds me of an Orange Julius. This secret ingredient can be added to cakes, cookies, sweet breads, muffins, and scones for a lovely mysterious flavor that you just can’t quite put your finger on when describing.

Eager to bake something with it, I turned to the King Arthur website for a recipe and chose Panettone Muffins. Perfect for the season and I had all the ingredients on hand. Fiori di Sicilia (flowers of Sicily) is traditionally used in Panettone, which is a classic Italian Christmas yeast bread. If you don’t have the Fiori di Sicilia, you can sub orange extract or orange essence, or just leave it out. You won’t get that special “je ne sais quoi,” but will still have a mighty tasty muffin.

The recipe calls for soaking the dried fruit in ¼ cup of apple juice, orange juice, or rum, but after reading the comments, I followed a suggestion and used Cointreau, an orange flavored liqueur (plan ahead and start the soaking the day before—it’s worth the extra time). To make the muffins partially whole-grain, I subbed in whole wheat pastry flour for some of the white all-purpose. If you don’t have the whole wheat, just use all-purpose for the full flour amount.

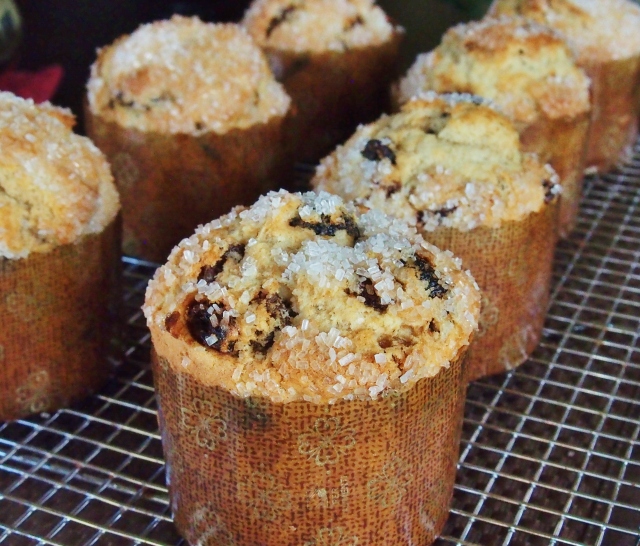
Made on a Saturday morning, we had them with scrambled eggs for a delicious treat that tasted like Christmas. Wanting to use my pretty muffin papers that hold more batter than a typical muffin pan, we ended up with a size in between regular and jumbo. If you do that too, you’ll need to increase the baking time.

Enjoy! And merry Christmas!


Panettone Muffins

Adapted from this King Arthur Baking Company Recipe

1 ½ cups diced dried fruit (I used a combination of dried cherries, cranberries, gold and regular raisins)

¼ cup apple juice, orange juice, or rum (or do what I did and use Cointreau or another orange liqueur)

4 tablespoons butter, at room temp

2 tablespoons vegetable oil (I used grapeseed—any neutral oil will do)

2/3 cup granulated sugar

2 large eggs, at room temp

¼ teaspoon Fiori di Sicilia (you can sub orange extract or orange essence, or just omit)

1 teaspoon pure vanilla extract

2 teaspoons baking powder

½ teaspoon fine grain salt

1 ¼ cups all-purpose flour

1 cup whole wheat pastry flour

2/3 cup milk

Several tablespoons of coarse sugar (turbinado, demerara, or sparkling sugar)

In a small bowl, mix the dried fruit with the juice or booze. Cover and let it rest overnight, stirring it up occasionally so the fruit is evenly saturated. You can speed this up by heating the fruit and liquid in the microwave until very hot and then letting it cool to room temperature, although I think it really benefits from the longer soaking time.

Preheat the oven to 375 degrees F. (or 350 on a convection setting). Lightly grease a 12-cup or two 6-cup muffin tins. If you use muffin papers, lightly spray them before adding the batter so the paper will come off the muffins easily.

In a medium mixing bowl, beat the butter, oil, and sugar together until smooth. Add the eggs and beat to combine. Stir in the Fiori di Sicilia and vanilla.

In a small bowl, whisk together the baking powder, salt, and flours. Stir the dry ingredients into the butter mixture alternately with the milk, starting and ending with the flour mixture and making sure everything is thoroughly combined.

Stir in the dried fruit and include any remaining liquid.

Spoon the batter evenly into prepared muffin pans or cups. Sprinkle the tops generously with the coarse sugar. Bake for 18-20 minutes (for standard muffins. If making larger ones, the cooking time will need to be increased), until a toothpick stuck in the middle comes out clean or with just a few crumbs clinging to it.

Remove muffins from the oven and let them sit in the pan for a few minutes before moving them to a cooling rack. Makes 12 standard muffins, or in my case, with the larger muffin papers, 7.

One comment after the recipe on King Arthur’s webpage said they are even better the next day and we’ll find out tomorrow if that’s true. With the boozy fruit and Fiori di Sicilia, I’m betting that will be the case.

Spaghetti with Cauliflower Meat Sauce


A little over two years ago when I posted this Cauliflower Taco Meat recipe, I mentioned wanting to tweak it with Italian seasonings to be used in things like lasagna, spaghetti sauce, and stuffed peppers. Well, it took me two years and several versions, but it’s finally exactly what I wanted it to be.

This hearty, meaty spaghetti sauce of my dreams will now be in regular rotation in our kitchen. Versatile cauliflower, along with meaty portabellas and healthy omega-3 fat-packed walnuts comes together with herbs and a rich red sauce to create a spaghetti dish I’m confident could hold its own in a cook-off against one made with ground beef.

You could use your favorite red sauce recipe, jarred marinara, or the quick homemade version I included that’s pulled from the headnotes of the Smitten Kitchen’s Stuffed Eggplant Parmesan, which sounds amazing in its own right.

Both the cauliflower meat and the sauce, if you’re making your own, can be done a day or two ahead, which would make this perfect for a weeknight.

To give it an extra dose of veggies, I sautéed some chopped onion and spinach from our garden with a little red wine before adding the sauce and meat. Feel free to leave that out if you’d like. Served over whole wheat spaghetti and topped with a little parmesan (omit for a vegan version) and fresh basil, you’ve got an amazing comfort food meal without the typical saturated fat and cholesterol. What could be better!?! Enjoy!


Spaghetti with Cauliflower Meat Sauce

Cauliflower Meat
3 cups cauliflower florets

1 ½ cups chopped cremini mushrooms

½ cup chopped walnuts

¼ cup tomato sauce

½ teaspoon salt

½ teaspoon fennel seeds

½ teaspoon onion powder

¼ teaspoon dried marjoram

Freshly ground black pepper

Preheat oven to 375 degrees F. Lightly oil a baking sheet.

Place cauliflower, mushrooms, walnuts, tomato sauce, salt, fennel seeds, onion powder, marjoram, and pepper in the bowl of a food processor and pulse on and off until the texture of ground beef. I found it easier to get the right texture by doing this in two batches, half of each ingredient in each batch. The first time I made it I did it all at once and half of it was almost like a paste—still tasted great, but just not the right texture. Transfer mixture to the baking sheet and spread it out in an even layer.

Bake for 30 minutes, stirring once at the half-way point.

Spaghetti or marinara sauce–homemade, jarred, or this quick Smitten Kitchen recipe:
Heat 2 tablespoons olive oil in a pot over medium, add 2 minced garlic cloves, 1 teaspoon kosher salt, and a pinch or three of red pepper flakes, and a little dried oregano, if you wish. Cook for one minute. Add a 28-ounce can crushed tomatoes (it will splatter, be careful) and stir (I used a can of whole San Marzano tomatoes and crushed them with a potato masher once in the pot). Cook at a simmer for 5 to 10 minutes, until you get the saucy consistency you want. This yields 3 cups.

To bring it all together
8 oz. regular or whole wheat spaghetti

1 tablespoon extra-virgin olive oil

½ of a medium yellow onion, chopped

A couple handfuls of fresh spinach, chopped

A splash or two of red wine

Salt & pepper

Freshly grated parmesan cheese, optional

Torn fresh basil leaves for garnish

Place a big pot of well-salted water on the stove and bring to a boil. Cook spaghetti according to package instructions. Drain and return to pot to keep warm.

Meanwhile, heat olive oil in a saucepan over medium heat. Add onions and sauté for several minutes until beginning to soften. Increase heat to medium-high and add spinach and red wine, plus a little salt & pepper. Cook, stirring occasionally, until spinach has wilted and wine has mostly cooked off.

Turn heat back down to medium and add 2 to 2 ½ cups red sauce. Add about half of your cauliflower meat (reserve the rest for another batch). Bring to a simmer and cook until heated through.

Pile pasta into bowls and top with cauliflower meat sauce, parmesan, and basil. Take a big whiff of all this wonderfulness, and dig in. Makes about 4 servings, with enough “meat” left for another batch.

Cherry Tomato Quick Kimchi


I recently read an article in which the author ponders the word kimchi not as a singular noun, but as a verb, in that you can kimchi just about anything. And “quick kimchi” at that! If  you can quick pickle, why not quick kimchi?

Having made kimchi before, I know it’s a process—chopping, brining, packing, and then the fermenting—it’s at least a week before you can enjoy this addicting Korean side dish. So to see an article that offered a recipe for a speedy option, I was intrigued.

The article included three quick kimchi recipes: smacked cucumber, fennel, and grape tomato. I had picked up an heirloom cherry tomato medley package the other day and had all the other ingredients, so that’s the version I went with.

This doesn’t have quite the funk of traditional kimchi, but it’s still delicious, addicting even. A little smoky, a little nutty, with the sweetness of cherry tomatoes and the heat of Korean chili pepper (gochugaru), it’s a unique dish with lots of uses. I served it with arugula over buttered baked potatoes and called it a meal. The next morning it was on homemade toasted bread and topped with a fried egg. I imagine it would be great with rice and crispy tofu or grilled portabella mushrooms. It’s even wonderful eaten out of the bowl all by itself while you’re waiting for your potatoes to bake! I see myself making this often throughout the summer as my cherry and pear tomato plants start producing. Enjoy!


Cherry Tomato Quick Kimchi

  • Servings: 2 1/2 cups
  • Print
From this NYT Cooking recipe

Note: Gochugaru (Korean chili flakes) is not the same as crushed red pepper flakes. It’s slightly sweet and smoky and has less heat than crushed red pepper or cayenne. You can probably find it at a well-stocked grocery store or Asian market, but if not, it’s easily available online.

1 pound cherry or grape tomatoes (about 2 to 3 cups), halved lengthwise

1 teaspoon kosher salt

2 tablespoons white distilled vinegar

½ teaspoon finely grated garlic

1 tablespoon plus 1 teaspoon sesame oil

1 tablespoon gochugaru (Korean chili flakes)

2 teaspoons tamari or soy sauce (can sub fish sauce if not vegetarian)

1 teaspoon granulated sugar

Thinly sliced scallions, chopped chives, cilantro, or flat-leaf parsley leaves for garnish (optional)

In a medium bowl, toss the tomatoes with the salt, transfer to a colander, and let sit in the sink to drain, about 30 minutes. Meanwhile, in the same bowl, add the vinegar and garlic and set aside.

After 30 minutes, add the sesame oil, gochugaru, soy or fish sauce, and sugar to the bowl with the vinegar and garlic and whisk to combine. Use a paper or cloth kitchen towel to pat the tomatoes dry, then add the tomatoes to the dressing and toss until well coated.

Garnish with the optional scallions or herbs before serving. This is best eaten right away, but can be refrigerated for up to 24 hours. Makes about 2 ½ cups.

Oregano-Hazelnut Pesto


Right now, we’re experiencing the kind of growing weather where everything is thriving. That perfect combination of sun, heat, and humidity that has your garden practically exploding. Especially my herbs. It’s times like this that I start to panic and wonder how will I ever use all the basil, sage, thyme, tarragon, and oregano.

Today my panic was focused on the oregano. Our tomatoes are weeks from being ready so that great tomato-oregano combination won’t happen for a while, but my oregano plant badly needed trimming. I began to wonder if there is such a thing as oregano pesto or would that be too strong a flavor? Yes, oregano pesto is a thing, my online research told me, and I was intrigued by a recipe that used hazelnuts in the pesto. That partial bag of hazelnuts buried in my freezer would finally get used!

It’s been a while since we’ve had pasta, so why not an oregano pesto penne pasta? Shallots for good measure, some quality parmesan because hello, Italian pasta dish, and a little lemon zest to finish. I’ve included the recipe below the pesto instructions–I think you’ll like it!

Fully prepared not to like this oregano version, I was pleasantly surprised and now have a new favorite pesto. The oregano was not overwhelming, and the hazelnuts brought a lovely, unique flavor. I’m looking forward to using some the of the leftover pesto on pizza this week. Enjoy!


Oregano-Hazelnut Pesto

  • Servings: 1 1/2 cups
  • Print
Inspired by this recipe

1 cup fresh oregano leaves (discard the stems)

½ cup unsalted hazelnuts

2 tablespoons freshly squeezed lemon juice

2 cloves garlic, minced

½ cup extra-virgin olive oil

Salt

In a small skillet, toast hazelnuts over medium-low heat until fragrant, about 5 minutes. Stir often so they don’t burn. Cool slightly.

Place oregano leaves, hazelnuts, lemon juice, and garlic into the bowl of a food processor. Pulse until well mixed. With machine running, slowly drizzle in olive oil. Scrape down sides and process until mixture is mostly smooth. Add salt, to taste.

Refrigerate, covered, until use. Keeps about 4 days. Freeze for longer storage.

Great on pasta (recipe follows), a little mixed into scrambled eggs, as a dip for good quality bread, in place of red sauce on pizza, or a dollop swirled into a bowl of soup. Makes about 1 ½ cups pesto.

Penne Pasta with Oregano-Hazelnut Pesto, Shallots, and Lemon Zest

8 oz. penne pasta, regular or whole wheat

1 medium shallot, thinly sliced

1 tablespoon extra-virgin olive oil

Oregano-hazelnut pesto (about half of above recipe)

¼ cup freshly grated parmesan cheese, optional

Grated zest of one lemon

Cook pasta in a pot of well-salted boiling water, according to package directions. Reserve about ½ cup of pasta water before draining.

Meanwhile, heat olive oil in a small skillet over medium heat. Add shallots and sauté until soft, about 5 minutes.

Return drained pasta to pan and add shallots, pesto, parmesan (if using), and about a third a cup of reserved pasta water. Toss to coat pasta until sauce becomes creamy. Add a little more pasta water if necessary. Transfer pasta to serving bowls, top with lemon zest and additional parmesan, if desired. Makes 3-4 servings.

Creamy Lentil and Spinach Stew


Like many of you during this time of stay-at-home directives and all-but-essential errands being curtailed, I’ve come to rely on recipes that pull from the pantry and use ingredients most often kept on-hand.

Last night, I decided that lentils and spinach would take center stage in our dinner. I googled lentil & spinach recipes and combined a couple. The result was this delicious stew that I served over brown rice. The veggies can be customized to what you have on hand, celery, mushrooms, leeks, etc., and if you don’t have spinach, kale or Swiss chard would be nice substitutes. Don’t skip the drizzle of olive oil and red wine vinegar at the end—it brings the yum factor over the top! Enjoy!


Creamy Lentil and Spinach Stew

Adapted from this Taste of Home recipe and this Pinch of Yum recipe

2 tablespoons extra virgin olive oil

Half a yellow onion, chopped

1 carrot, diced

½ a green bell pepper, chopped

¼ teaspoon salt

¼ cup dry white wine

1 cup uncooked green or brown lentils, picked over, rinsed, and drained

2 small Yukon gold potatoes, chopped (about 1 cup)

4 cups vegetable broth/stock, divided

1 bay leaf

½ teaspoon dried thyme

1 tablespoon Worcestershire sauce (the Annie’s brand is vegetarian)

Freshly ground black pepper, to taste

1/3 cup milk or cream

3 to 4 cups fresh baby spinach, chopped

Olive oil and red wine vinegar for final drizzling

Hot, cooked brown rice

Heat the olive oil in a Dutch oven or large heavy-bottomed saucepan over medium heat. Add onions, carrot, and green pepper, and ¼ teaspoon salt, and cook, stirring occasionally, for about 10 minutes until the veggies have softened. Add the wine and stir, making sure to scrape any brown bits from the bottom of the pan.

Stir in the lentils, potatoes, 2 cups broth, bay leaf, thyme, Worcestershire sauce, and pepper. Bring to a simmer and put a lid on the pot to partially cover. Simmer for 30-45 minutes, stirring occasionally and adding more broth, as needed, to keep the lentils just covered (I used almost all of the remaining 2 cups).

When the lentils and potatoes are tender, mash some of the potatoes against the side of the pan to give a creamy texture.

Remove the bay leaf and stir in the milk/cream and the spinach. Cook until spinach has wilted. Taste, and add more salt and pepper, if necessary.

Serve over brown rice and drizzle with a little extra-virgin olive oil and red wine vinegar. Makes about 4 servings.


Big Crunchy-Lidded Blueberry Muffins


Last weekend, while preparing for what feels like the apocalypse (Covid-19 pandemic), I turned to the comforting task of baking, thinking it would be nice to have something on hand I could freeze and take out for a little treat here and there. We all still need treats!

Recently I made muffins for a work party welcoming a new staff member and they were delicious. With blueberries still in the fridge, making blueberry muffins was the obvious choice, but I had run out of grapeseed oil, my go-to neutral oil when a recipe calls for canola or vegetable oil.

Having made some cakes and sweet breads with olive oil, I thought that might make a suitable substitute, but wasn’t sure if the flavor would overwhelm the blueberries. What I ended up using was a mixture of olive oil and melted butter, and I actually think it made for an even better muffin than the original. Also, instead of the coarse sugar the recipe suggested sprinkling on the muffins prior to baking, I opted for cinnamon sugar. And to make the muffins lean a little healthy, I used whole wheat pastry flour for half of the all-purpose flour the recipe called for.

Off to the freezer these muffins went. We’ll dig into them once the Chocolate Stout Cupcakes with Irish Whiskey Buttercream I made for the office birthday party that was cancelled because we’re all now working from home are gone. I hope this social distancing thing doesn’t result in packing on a few extra pounds—I am making sure to work out a little longer each day now that I don’t have drive time.

Enjoy these treats if you make them, and by the way, frozen blueberries will work equally well. Wishing you all good health in the days to come!


Big Crunchy-Lidded Blueberry Muffins

  • Servings: 8 large or 14 regular muffins
  • Print
Adapted from this Sally’s Baking Addiction recipe, one of my go-to sites for all things baking. I used these muffin/cupcake molds and they make a large, but not jumbo muffin. They stand by themselves on a baking tray. You could also use a large muffin tin. If you want standard size muffins, the baking time will need to be shorted and I have listed the different times in the recipe instructions.

1 ½ cups unbleached all-purpose flour

1 ½ cups whole wheat pastry flour

4 teaspoons baking powder

½ teaspoon salt

1 teaspoon ground cinnamon

2 large eggs, at room temperature

1 cup granulated sugar

1 cup low-fat buttermilk, at room temperature

¼ cup (half a stick) butter, melted

¼ cup extra-virgin olive oil

1 teaspoon pure vanilla extract

1 ½ cups fresh or frozen (do not defrost) blue berries, divided

Cinnamon sugar for sprinkling (1/4 cup granulated sugar mixed with one tablespoon cinnamon)

Preheat oven to 425 degrees F. If not using muffin molds or liners, spray your muffin pan with non-stick spray or butter it.

In a large bowl, mix together the flours, baking powder, salt, and cinnamon.

In a medium bowl, whisk together the eggs, sugar buttermilk, butter, oil and vanilla extract.

Make a well in the center of the dry ingredients and pour in the buttermilk mixture. Mix together until just combined—don’t over mix. Batter will be thick. Gently fold in 1 ¼ of the 1 ½ cups blueberries.

Scoop batter into prepared molds or muffin pans, filling about ¾ of the way full. Top each muffin with a few blueberries from the reserved ¼ cup. Sprinkle generously with cinnamon sugar (you will probably not use it all—save for cinnamon toast on a rainy morning).

If making large muffins, bake at 425 degrees F. for 5 minutes, and then reduce oven temperature to 375 degrees F. Bake for an additional 20 minutes or until tops are golden and a toothpick or tester inserted into the center of muffins comes out clean. If making regular-sized muffins, cook 5 minutes at 425 degrees F., reduce oven temp to 375, and continue baking for another 12 minutes or so.

Set pan on a cooling rack for 10 minutes, then remove muffins from pan and continue cooling on rack. Makes about 8 large or 14 regular muffins.


Italian Meatless Balls


I’ve been working on my Christmas menu ever since Thanksgiving and have changed my mind several times, but finally settled on spaghetti and meatballs. Real meatballs will be served for most, with a meatless version for the vegetarian (me) and those wanting to try something different.

I made this Smitten Kitchen meatball recipe for the carnivores and used aspects of the same recipe for the veggie version, with the main ingredients from my Cauliflower Taco Meat as the base. The cauliflower florets, mushrooms, and walnuts are pulsed in the food processor with a little tomato sauce to make what actually looks a lot like raw ground beef. In addition to the ingredients from the meat recipe, I added fennel seeds, oregano, and marjoram for more Italian flavors.

I made these three times, tweaking things a bit with each version, to arrive at what I think are a pretty great vegetarian Italian meatball. I froze them and the “real” meatballs and will serve them in sauce with spaghetti on Christmas. They would also be good in a meatball sandwich, served on pizza, and as an appetizer with dipping sauce (a mixture of apricot preserves, barbeque sauce, and a little Dijon mustard is quite tasty!). Enjoy!


Italian Meatless Balls

3 cups cauliflower florets

1 ½ cups chopped cremini mushrooms

1 ½ cups chopped walnuts

1/3 cup tomato sauce

¼ cup chopped curly parsley

¼ cup freshly grated parmesan or romano cheese

1 teaspoon kosher salt

1 to 1 ½ teaspoons fennel seeds

½ teaspoon dried marjoram

½ teaspoon dried oregano

½ teaspoon onion powder

½ teaspoon garlic powder

¼ teaspoon crushed red pepper flakes

2 eggs, lightly beaten

Preheat oven to 400 degrees F. Line a large baking sheet with parchment and set aside.

Place cauliflower, mushrooms, walnuts, and tomato sauce in bowl of a food processor and pulse until the texture of raw finely ground beef.

Transfer mixture to a large bowl. Add remaining ingredients and mix to thoroughly combine. Form mixture into 2-inch balls; I used a #30 cookie scoop (press meatballs a bit to pack them before rolling into balls). Place on prepared baking sheet.

Bake balls about 20 minutes, until lightly browned and firm. Makes about 30 balls.

Use in spaghetti, meatball sandwiches, as a pizza topping, or with a dipping sauce as an appetizer (we’re talking a mixture of apricot preserves, barbeque sauce, and a little Dijon mustard—yum).