Panettone Muffins


A few weeks ago, I ordered a new-to-me ingredient from King Arthur Baking Company, Fiori di Sicilia. It’s a blend of citrus and vanilla with a subtle floral aroma that reminds me of an Orange Julius. This secret ingredient can be added to cakes, cookies, sweet breads, muffins, and scones for a lovely mysterious flavor that you just can’t quite put your finger on when describing.

Eager to bake something with it, I turned to the King Arthur website for a recipe and chose Panettone Muffins. Perfect for the season and I had all the ingredients on hand. Fiori di Sicilia (flowers of Sicily) is traditionally used in Panettone, which is a classic Italian Christmas yeast bread. If you don’t have the Fiori di Sicilia, you can sub orange extract or orange essence, or just leave it out. You won’t get that special “je ne sais quoi,” but will still have a mighty tasty muffin.

The recipe calls for soaking the dried fruit in ¼ cup of apple juice, orange juice, or rum, but after reading the comments, I followed a suggestion and used Cointreau, an orange flavored liqueur (plan ahead and start the soaking the day before—it’s worth the extra time). To make the muffins partially whole-grain, I subbed in whole wheat pastry flour for some of the white all-purpose. If you don’t have the whole wheat, just use all-purpose for the full flour amount.

Made on a Saturday morning, we had them with scrambled eggs for a delicious treat that tasted like Christmas. Wanting to use my pretty muffin papers that hold more batter than a typical muffin pan, we ended up with a size in between regular and jumbo. If you do that too, you’ll need to increase the baking time.

Enjoy! And merry Christmas!


Panettone Muffins

Adapted from this King Arthur Baking Company Recipe

1 ½ cups diced dried fruit (I used a combination of dried cherries, cranberries, gold and regular raisins)

¼ cup apple juice, orange juice, or rum (or do what I did and use Cointreau or another orange liqueur)

4 tablespoons butter, at room temp

2 tablespoons vegetable oil (I used grapeseed—any neutral oil will do)

2/3 cup granulated sugar

2 large eggs, at room temp

¼ teaspoon Fiori di Sicilia (you can sub orange extract or orange essence, or just omit)

1 teaspoon pure vanilla extract

2 teaspoons baking powder

½ teaspoon fine grain salt

1 ¼ cups all-purpose flour

1 cup whole wheat pastry flour

2/3 cup milk

Several tablespoons of coarse sugar (turbinado, demerara, or sparkling sugar)

In a small bowl, mix the dried fruit with the juice or booze. Cover and let it rest overnight, stirring it up occasionally so the fruit is evenly saturated. You can speed this up by heating the fruit and liquid in the microwave until very hot and then letting it cool to room temperature, although I think it really benefits from the longer soaking time.

Preheat the oven to 375 degrees F. (or 350 on a convection setting). Lightly grease a 12-cup or two 6-cup muffin tins. If you use muffin papers, lightly spray them before adding the batter so the paper will come off the muffins easily.

In a medium mixing bowl, beat the butter, oil, and sugar together until smooth. Add the eggs and beat to combine. Stir in the Fiori di Sicilia and vanilla.

In a small bowl, whisk together the baking powder, salt, and flours. Stir the dry ingredients into the butter mixture alternately with the milk, starting and ending with the flour mixture and making sure everything is thoroughly combined.

Stir in the dried fruit and include any remaining liquid.

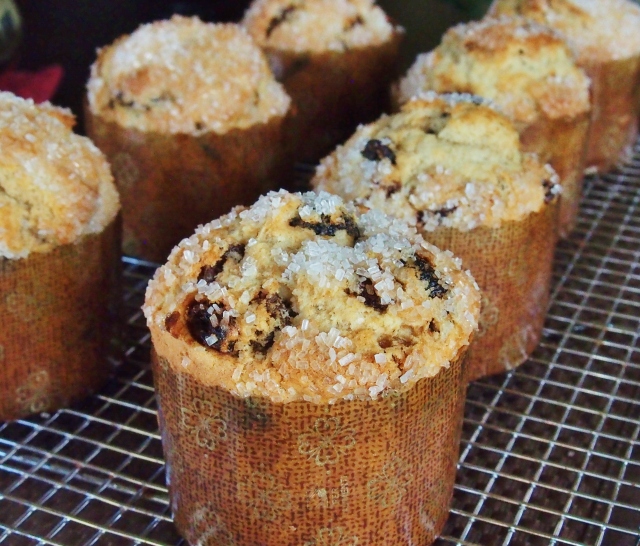
Spoon the batter evenly into prepared muffin pans or cups. Sprinkle the tops generously with the coarse sugar. Bake for 18-20 minutes (for standard muffins. If making larger ones, the cooking time will need to be increased), until a toothpick stuck in the middle comes out clean or with just a few crumbs clinging to it.

Remove muffins from the oven and let them sit in the pan for a few minutes before moving them to a cooling rack. Makes 12 standard muffins, or in my case, with the larger muffin papers, 7.

One comment after the recipe on King Arthur’s webpage said they are even better the next day and we’ll find out tomorrow if that’s true. With the boozy fruit and Fiori di Sicilia, I’m betting that will be the case.

Cherry Tomato Quick Kimchi


I recently read an article in which the author ponders the word kimchi not as a singular noun, but as a verb, in that you can kimchi just about anything. And “quick kimchi” at that! If  you can quick pickle, why not quick kimchi?

Having made kimchi before, I know it’s a process—chopping, brining, packing, and then the fermenting—it’s at least a week before you can enjoy this addicting Korean side dish. So to see an article that offered a recipe for a speedy option, I was intrigued.

The article included three quick kimchi recipes: smacked cucumber, fennel, and grape tomato. I had picked up an heirloom cherry tomato medley package the other day and had all the other ingredients, so that’s the version I went with.

This doesn’t have quite the funk of traditional kimchi, but it’s still delicious, addicting even. A little smoky, a little nutty, with the sweetness of cherry tomatoes and the heat of Korean chili pepper (gochugaru), it’s a unique dish with lots of uses. I served it with arugula over buttered baked potatoes and called it a meal. The next morning it was on homemade toasted bread and topped with a fried egg. I imagine it would be great with rice and crispy tofu or grilled portabella mushrooms. It’s even wonderful eaten out of the bowl all by itself while you’re waiting for your potatoes to bake! I see myself making this often throughout the summer as my cherry and pear tomato plants start producing. Enjoy!


Cherry Tomato Quick Kimchi

  • Servings: 2 1/2 cups
  • Print
From this NYT Cooking recipe

Note: Gochugaru (Korean chili flakes) is not the same as crushed red pepper flakes. It’s slightly sweet and smoky and has less heat than crushed red pepper or cayenne. You can probably find it at a well-stocked grocery store or Asian market, but if not, it’s easily available online.

1 pound cherry or grape tomatoes (about 2 to 3 cups), halved lengthwise

1 teaspoon kosher salt

2 tablespoons white distilled vinegar

½ teaspoon finely grated garlic

1 tablespoon plus 1 teaspoon sesame oil

1 tablespoon gochugaru (Korean chili flakes)

2 teaspoons tamari or soy sauce (can sub fish sauce if not vegetarian)

1 teaspoon granulated sugar

Thinly sliced scallions, chopped chives, cilantro, or flat-leaf parsley leaves for garnish (optional)

In a medium bowl, toss the tomatoes with the salt, transfer to a colander, and let sit in the sink to drain, about 30 minutes. Meanwhile, in the same bowl, add the vinegar and garlic and set aside.

After 30 minutes, add the sesame oil, gochugaru, soy or fish sauce, and sugar to the bowl with the vinegar and garlic and whisk to combine. Use a paper or cloth kitchen towel to pat the tomatoes dry, then add the tomatoes to the dressing and toss until well coated.

Garnish with the optional scallions or herbs before serving. This is best eaten right away, but can be refrigerated for up to 24 hours. Makes about 2 ½ cups.

Strawberry Dutch Baby


It just doesn’t seem appropriate now to write about light-hearted things like recipes and food with the recent murder-by-cop of George Floyd in Minneapolis and the ensuing riots (not to be lumped in with the peaceful protests), which have now spread across the country. I want to share recipes, but it seems so frivolous and unimportant at this time. However, we all need to eat, so here goes…

I’ve heard of Dutch babies before but had never had or made one. Lately it seemed recipes were everywhere I looked, and I took that as a sign I should join the party.

Apparently Dutch babies aren’t actually Dutch. They are a German pancake that earned the moniker Dutch when someone confused the word Deutsch with Dutch. So, there you have it.

Regardless of the name or origin, they are easy, versatile, and delicious. I’ve made sweet versions with both apples and strawberries and I plan to make a savory one soon (just omit the sugar in the batter and add a few grinds of black pepper) with some veggies and a sprinkling of grated cheese when done. And unlike regular pancakes, you can relax while it’s baking with no need to stand over the stove flipping flapjacks. Enjoy!


Strawberry Dutch Baby

Adapted from New York Times Cooking

One Dutch baby serves two generously and four for a lighter meal. You’ll get more of the signature puffing and rumpling if your milk and eggs are at room temperature to start.

3 eggs, room temperature

½ cup milk, room temperature (I used skim)

½ teaspoon pure vanilla extract

½ cup all-purpose flour

1 tablespoon sugar

½ teaspoon cinnamon (optional if using strawberries, but a must with apples)

Pinch of nutmeg

Pinch of salt

3 tablespoons butter, cut into cubes

About 3/4 cup of sliced strawberries or apples

Pure maple syrup, for serving

Preheat oven to 425 degrees F. and place a 10-inch cast iron pan in the oven.

In a medium bowl, whisk together eggs, milk, vanilla, flour, sugar, cinnamon, nutmeg, and salt until very well combined (could also do this in a blender, but I didn’t want to have a blender to clean).

When oven reaches 425, carefully remove pan from oven and add butter. Once it’s melted, scatter strawberry slices on bottom of pan. Pour batter into pan and carefully return to the oven. Cook for about 18 minutes, until pancake is puffed and golden (do not open the oven door—try to determine if it’s done through the window). Turn oven off and leave pancake in the oven for 5 minutes. Remove from oven and cut into wedges. Serve with pure maple syrup or whatever toppings you’d like. Makes 2 generous or 4 smaller servings.


Big Crunchy-Lidded Blueberry Muffins


Last weekend, while preparing for what feels like the apocalypse (Covid-19 pandemic), I turned to the comforting task of baking, thinking it would be nice to have something on hand I could freeze and take out for a little treat here and there. We all still need treats!

Recently I made muffins for a work party welcoming a new staff member and they were delicious. With blueberries still in the fridge, making blueberry muffins was the obvious choice, but I had run out of grapeseed oil, my go-to neutral oil when a recipe calls for canola or vegetable oil.

Having made some cakes and sweet breads with olive oil, I thought that might make a suitable substitute, but wasn’t sure if the flavor would overwhelm the blueberries. What I ended up using was a mixture of olive oil and melted butter, and I actually think it made for an even better muffin than the original. Also, instead of the coarse sugar the recipe suggested sprinkling on the muffins prior to baking, I opted for cinnamon sugar. And to make the muffins lean a little healthy, I used whole wheat pastry flour for half of the all-purpose flour the recipe called for.

Off to the freezer these muffins went. We’ll dig into them once the Chocolate Stout Cupcakes with Irish Whiskey Buttercream I made for the office birthday party that was cancelled because we’re all now working from home are gone. I hope this social distancing thing doesn’t result in packing on a few extra pounds—I am making sure to work out a little longer each day now that I don’t have drive time.

Enjoy these treats if you make them, and by the way, frozen blueberries will work equally well. Wishing you all good health in the days to come!


Big Crunchy-Lidded Blueberry Muffins

  • Servings: 8 large or 14 regular muffins
  • Print
Adapted from this Sally’s Baking Addiction recipe, one of my go-to sites for all things baking. I used these muffin/cupcake molds and they make a large, but not jumbo muffin. They stand by themselves on a baking tray. You could also use a large muffin tin. If you want standard size muffins, the baking time will need to be shorted and I have listed the different times in the recipe instructions.

1 ½ cups unbleached all-purpose flour

1 ½ cups whole wheat pastry flour

4 teaspoons baking powder

½ teaspoon salt

1 teaspoon ground cinnamon

2 large eggs, at room temperature

1 cup granulated sugar

1 cup low-fat buttermilk, at room temperature

¼ cup (half a stick) butter, melted

¼ cup extra-virgin olive oil

1 teaspoon pure vanilla extract

1 ½ cups fresh or frozen (do not defrost) blue berries, divided

Cinnamon sugar for sprinkling (1/4 cup granulated sugar mixed with one tablespoon cinnamon)

Preheat oven to 425 degrees F. If not using muffin molds or liners, spray your muffin pan with non-stick spray or butter it.

In a large bowl, mix together the flours, baking powder, salt, and cinnamon.

In a medium bowl, whisk together the eggs, sugar buttermilk, butter, oil and vanilla extract.

Make a well in the center of the dry ingredients and pour in the buttermilk mixture. Mix together until just combined—don’t over mix. Batter will be thick. Gently fold in 1 ¼ of the 1 ½ cups blueberries.

Scoop batter into prepared molds or muffin pans, filling about ¾ of the way full. Top each muffin with a few blueberries from the reserved ¼ cup. Sprinkle generously with cinnamon sugar (you will probably not use it all—save for cinnamon toast on a rainy morning).

If making large muffins, bake at 425 degrees F. for 5 minutes, and then reduce oven temperature to 375 degrees F. Bake for an additional 20 minutes or until tops are golden and a toothpick or tester inserted into the center of muffins comes out clean. If making regular-sized muffins, cook 5 minutes at 425 degrees F., reduce oven temp to 375, and continue baking for another 12 minutes or so.

Set pan on a cooling rack for 10 minutes, then remove muffins from pan and continue cooling on rack. Makes about 8 large or 14 regular muffins.


Ultimate Zucchini Bread


Up until recently, if you mentioned zucchini bread to me, I would have said, “Meh.” It was okay, but nothing I would have chosen to make unless I was desperate to use up some zucchini and wasn’t feeling a savory recipe.

So when I saw a zucchini bread recipe pop up on the Smitten Kitchen, the only reason I didn’t skip right over it was the word “ultimate” in the title. Deb Perelman doesn’t throw around words like that without the goods to back ‘em up.

With that in mind, and some farmers’ market zucchini in the crisper, I baked a loaf that Pete and I enjoyed the heck out of. Soon after, another one when I had a tooth pulled and needed something moist and soft that didn’t require actual chewing (and kept this one all to myself). And another loaf after that to serve with breakfast when my parents were visiting. And, again, to take to take to the cabin. In between, I was craving this stuff. Crazy, right? Never in a million years did I think I’d actually be craving zucchini bread!

The nice thing is, this loaf of yumminess is so quick to mix up and pop in the oven. A one-bowl feat of ease with no need to wring the moisture out of the zucchini. And it freezes beautifully!

Deb mentions using a neutral oil, melted, butter, or olive oil. Wanting to maximize the health factor, I opted for olive oil. With the first loaf, I think I used whole wheat pastry flour for ½ cup of the 2 cups flour, and each time I made it, I increased the percentage of whole wheat till there was no white flour included. Totally whole grain without any heaviness or grainy texture—yay!

The only hard part about this recipe is the suggestion requirement of waiting 24 hours after baking to dig into it. Be assured, though, this is necessary in order for it to live up to the “ultimate” moniker. Once you’ve waited that excruciatingly long full day, I think you’ll agree, the delay was worth it.

In order to keep the crunchy dome of this treat crunchy, don’t cover it, just let it sit out on the counter in the pan in which it was baked—no need to do anything else—I’ve got four (or more by now) loaves under my belt, so am speaking from experience. Just wrap the cut end in foil and return it to the pan and keep it on the kitchen counter. I pretty much guarantee it won’t last long–it’s that good!

Eaten plain or slathered with whatever spread, butter, or topping you please, let this warmly-spiced sweet treat ease you into fall. And if you happen to have made a batch of the Smitten Kitchen’s Peach Butter like I did, it will elevate this “ultimate” zucchini bread to super ultimate status. Enjoy!


Amazing Zucchini Bread

Slightly adapted from this Smitten Kitchen Recipe

2 cups (13 ounces or 370 grams) grated, packed zucchini, not wrung out, grated on the large holes of a box grater

2 large eggs, room temperature

2/3 cup (160 ml) extra-virgin olive oil, butter, or a neutral oil like safflower or grapeseed

½ cup (95 grams) packed dark brown sugar

½ cup (100 grams) granulated sugar

1 teaspoon pure vanilla extract

1 teaspoon fine sea or table salt

1 ¼ teaspoons ground cinnamon

1/8 teaspoon ground or freshly grated nutmeg

¾ teaspoon baking soda

½ teaspoon baking powder

2 cups (9.65 ounces or 275 grams) whole wheat pastry flour (I like Whole Foods 365 Organic)

2 tablespoons raw or turbinado sugar

Heat oven to 350 degrees F. or 335 if you have a convection oven. Lightly coat a 6-cup or 9×5 inch loaf pan with cooking spray.

Place grated zucchini in a large bowl and add oil, eggs, brown and granulated sugars, vanilla, and salt. Mix with a fork until combined.

Sprinkle cinnamon, nutmeg, baking soda, and baking powder over the surface of the batter and mix until combined. Then, to ensure ingredients are well-dispersed, mix an additional 10 or so stirs.

Add flour and mix until combined, with no pockets of flour remaining. Pour into prepared pan and smooth the top. Sprinkle with the raw or turbinado sugar—use it all—it will make that awesome crunchy dome.

Bake for 55-60 minutes or until a toothpick or tester inserted into the middle of the loaf comes out batter-free. Because I have a history of quick breads being doughy in the middle, to ensure doneness, I also use an instant read thermometer to test the internal temperature. If it’s not between 195 and 200 degrees F., I put it back in the oven until it reaches that temperature range.

Remove from oven and cool completely on a wire rack. Leave in the pan, unwrapped, overnight or 24 hours. Remove loaf carefully from pan, being careful not to ruin the crunchy lid, and cut into slices. Zucchini bread keeps 4-5 days at room temperature. Only the cut end of the loaf needs to be wrapped in foil; store the bread in the baking pan.

Makes 8-10 servings.


Buttermilk Chive Bread


After returning from an all-too-short cabin trip over the 4th of July, we had a big bag of cabin chives to use. I’ve written about our cabin chives before—they come from the most prolific chive plant I’ve ever seen, and it’s situated smack dab in front of the cabin. The Lake Superior air must be good for it.

You can cut chives from this plant almost any time of the year. We’ve even dug through the snow to find fresh chives in winter. Seriously!

A couple years ago after bringing a bag of chives home, I got to thinking about chives and buttermilk pairing so well together and wondered how that would translate into bread. I found a recipe online, tweaked it some, including incorporating whole wheat flour and doubling the chives (hey, when you’ve got good chives, flaunt ’em!), and the rest is history. It’s become a staple in our house whenever we bring home chives. Perfect for either sandwiches or toasted and spread with good butter, it’s got a pleasant tang from the buttermilk and an oniony hint that lots of chives bring. I see sandwiches in your future! Enjoy!

By the way, if you’re lucky enough to have the chive flowers, in addition to being pretty, they add a delicious delicate flavor to whatever you add them. We love the on salads!


Buttermilk Chive Bread

Adapted from this Iowa Housewife recipe

4 cups bread flour, divided

2 cups whole wheat flour

4 teaspoons instant yeast (if using active dry yeast instead, double rising times)

2 tablespoons sugar

1 tablespoon salt

¼ cup neutral oil (grapeseed, avocado, canola) or melted butter

1 ¼ cup warm water, about 110 degrees F.

1 cup warm buttermilk (I use low-fat), about 110 degrees F.

½ cup chopped chives

2 tablespoons butter, melted, for brushing on cooked loaves (optional)

Grease two 4 ½ x 8 ½ inch loaf pans. Set aside.

Place three cups of the bread flour, the whole wheat flour, yeast, sugar, and salt into the bowl of a stand mixer. Mix until combined (if you don’t have a stand mixer, use a whisk).

With mixer on low speed, add the oil/butter, water, and buttermilk. Gradually add the remaining cup of bread flour and mix until dough leaves the sides of the bowl. Turn speed up slightly and mix for about two minutes. If you don’t have a stand mixer, mix all ingredients together using a wooden spoon.

Add chives and change to the dough hook, and, at low speed, knead about five minutes (if you don’t have a stand mixer, knead by hand on a lightly floured surface for about 5 minutes). Cover bowl and let rest in a warm place for about 10 minutes. Turn dough out of bowl onto a floured surface and divide in half. Form into loaves and place in prepared pans. Loosely cover the pans with a tea towel and let rise in a warm place for about 30 minutes.

While dough is rising, preheat oven to 400 degrees F. Bake loaves for 25-30 minutes. Remove loaves from pans onto a cooling rack. Brush tops with melted butter. Slice and eat either warm or room temp. Loaves freeze well. Makes two loaves.

Pumpkin Butter


Similar to jams and jellies, fruit butters (and in this case vegetable butter) are slow-cooked to evaporate moisture and caramelize sugars. When finished, they’re dense and smooth with the spreadable texture of room temperature butter, thus, the name.

The result has a concentrated flavor of the fruit or vegetable that’s deep and luscious in a way that jams and jellies aren’t. I’ve made peach butter a couple times and love it on toasted English muffins, as an ice-cream topping, and even as a sandwich spread to give a sweet edge to a savory lunch. Makes me look forward to peach season!

This time of year, pumpkin is perfect for the butter treatment. Going light on the added sugars lets the natural sweetness of the pumpkin shine through and the apple cider and spices give it that cozy, fall warmth that is so welcome when the temperatures start to drop.

Limited only by your imagination, the uses for this magical elixir are endless: Spread on warm biscuits, swirled into plain yogurt, mixed into cream cheese and slathered on bagels, as a pancake topping, an oatmeal mix-in, or ice-cream topping. And because this doesn’t hit you with first with sweetness, it can be used in savory dishes like maybe mixed into browned butter, sage, shallots, and crushed red pepper for a delicious seasonal pasta sauce. The thought has my mouth watering!

One of my favorite things about using whole pumpkin or squash, as opposed to canned, is the seeds. I almost never discard them. Once cleaned, tossed with a little neutral oil, sprinkled with salt, and roasted until crisp and golden, they are an addictive snack (instructions included at the end of the recipe).

Whatever uses you come up with for this fall treat, you’ll be happy you made it. Enjoy!


Pumpkin Butter

  • Servings: 1 1/2 pints
  • Print
Adapted slightly from this Food & Wine Magazine recipe

1 (approximately 3 pound) sugar or pie pumpkin, stemmed, halved lengthwise, and seeded*

1 tablespoon neutral oil (grapeseed, canola, vegetable)

¼ cup apple cider

1/3 cup brown sugar (light or dark)

3 tablespoons pure maple syrup

1 teaspoon apple cider vinegar

¾ teaspoon ground cinnamon

½ teaspoon ground ginger

½ teaspoon kosher salt (if using a fine salt, reduce to ¼ teaspoon)

¼ teaspoon freshly grated or ground nutmeg

Pinch of ground cloves

Pinch of ground allspice

Preheat oven to 350 degrees F. Brush cut sides of pumpkin halves with the oil. Place pumpkin halves, cut side down, on a large, rimmed baking sheet (less mess if you line the sheet with parchment paper, but not essential). Bake until very tender when pierced with a sharp knife, about 50 minutes. Remove from oven and let cool slightly, 10-15 minutes.

Scoop flesh from cooled pumpkin halves and transfer to bowl of a food processor. Discard pumpkin shell. To food processor, add apple cider and process until smooth, about one minute, stopping to scrape down sides of bowl when necessary. Add brown sugar, maple syrup, vinegar, cinnamon, ginger, salt, nutmeg, cloves, and allspice. Process until smooth, about 30 seconds, scrape down sides, and give it one more pulse.

Transfer pumpkin mixture to a deep saucepan, cover, and bring to a simmer over medium heat, stirring occasionally. Reduce heat to low, keep cover on, but vented (it sputters and spatters), and cook, stirring occasionally with a rubber spatula so that bottom of saucepan doesn’t scorch. Cook until mixture is reduced by about one-third and turns slightly darker in color, about 40-45 minutes. Remove from heat and let cool to room temperature, about 30 minutes. Transfer to jars and refrigerate. Keeps in the refrigerator 2-3 weeks and can be frozen for several months. Makes about 1 ½ pints.

*Don’t toss out those seeds! Roasted, they make a delicious and nutritious snack. Simply clean the pumpkin flesh out of the seeds, toss them with a little neutral oil (a couple teaspoons to a tablespoon, depending on the amount of seeds), and sprinkle with salt. Cook at 400 degrees F. in a single layer on a baking sheet for about 30 minutes, stirring once or twice for even browning. If you don’t eat them all right away, store in a zip-lock bag or other air-tight container.

Red Flannel Hash


We grew beets in our garden this summer for the first time in several years. Then the green beans and zucchini overtook the beets and we kind of forgot about them—out of sight, out of mind. Last weekend we decided to wade through the overgrowth and see if there were actually beets underneath. There were! Nice, medium sized beets. The greens had seen better days and were unusable, but the beets were beautiful.

Wanting to make something a little different, I started digging around online and red flannel hash came up. I’ve heard of it, but never had it. Turns out the traditional version, which originated in New England, has beets, red potatoes, and corned beef, but the few vegetarian recipes I found didn’t really change much other than to leave out the corned beef. I pulled aspects of a number of different recipes to come up with this delightful dish.

We topped our crispy red flannel hash with poached eggs and had toast on the side. It was delicious! A very pretty change from typical breakfast potatoes and the beets, Worcestershire, and horseradish gave it oomph and a unique quality that we loved. Enjoy!


Red Flannel Hash

A little advanced prep is needed to cook the beets and potatoes, but if you do that a day or two before, the hash comes together very quickly.

2 tablespoons butter

1 tablespoon extra-virgin olive oil

1 cup chopped onion

1 ½ cups cubed cooked and peeled beets

2 cups cubed, cooked, skin on, red potatoes

1 tablespoon Worcestershire sauce (the Annie’s brand is vegetarian)

2 teaspoons prepared horseradish

1/3 cup chopped fresh parsley

Salt and freshly ground black pepper

Heat butter and olive oil in a cast iron skillet over medium heat. When hot, add onions and a sprinkling of salt. Cook, stirring occasionally, until onions begin to soften, about 5 minutes.

Add the beets and potatoes, sprinkle with salt and pepper, to taste, and stir to combine. When warmed through, add the Worcestershire and horseradish. Stir and then press the mixture down in the pan with a large spatula, which will help it brown on the bottom. Let it cook undisturbed for about 5 minutes, then turn it by sections and press down again, and cook another 4 or 5 minutes to crisp the other side.

For breakfast/brunch, serve with poached or fried eggs. Or serve as a side dish with lunch or dinner. Makes about 4 servings.


Zucchini Fritters


Okay folks, it’s that time of year, when zucchini begin their annual attempt to take over the world, or at least our gardens. Co-workers will bring bags of it to work and beg you to take some. Zucchini bread will show up on the break room table multiple times.  You can buy a shopping bag full dirt cheap at the farmers’ market. It’s everywhere, it’s everywhere!

What to do with this abundance? Here’s a recipe that will use up a pound of the stuff and have you wanting more so badly you’ll put it in your regular rotation until zucchini season is over, and then you’ll be sad.

After finding this recipe last year, I bought zucchini each week at the farmers’ market, something I’ve never done before. Great as an appetizer for a summer dinner party, but just as good as a weeknight supper. Accompanied by a salad, you’ve got your quota of veggies and then some. Leftovers with a poached egg for breakfast are incredibly good!

The key to making these little cakes of deliciousness as crispy as a fritter should be is getting as much water out of your shreds as possible. The salt you mix the shredded zucchini with draws out the water and you’ll be able to wring out more than you ever thought possible. Last night I made a double batch and must have squeezed out over two cups.

Before draining

Before draining

After water squeezed out

After squeezing out water


The topping recipe included, along with the crisp fitters, creates a combination that will make you want to keep a full batch of these babies to yourself and eat them all (which is what I set out to do last night when I made that double batch for just Pete and me—although I did have a few left over).

I should point out this recipe is the reason we are now growing zucchini in our garden. More fritters for us! Enjoy!

Zucchini Fritters

  • Servings: makes about ten 2 1/2 inch fritters
  • Print
Recipe from the Smitten Kitchen

1 pound (about 2 medium) zucchini or a combo of zucchini and yellow squash

1 teaspoon coarse or Kosher salt, plus extra to taste (decrease to ½ teaspoon if you only have fine salt)

2 scallions, split lengthwise and sliced thin

1 large egg, lightly beaten

Freshly ground black pepper

1/2 cup all-purpose flour (I used half all-purpose and half whole wheat pastry flour)

1/2 teaspoon baking powder

Olive or another oil of your choice, for frying (I like grapeseed or avocado oil)

To serve (optional, but really not, in my opinion—go for it!)
1 cup sour cream or plain, full-fat yogurt (Greek yogurt is perfect!)

1 to 2 tablespoon lemon juice

1/4 teaspoon lemon zest

Pinches of salt

1 small minced or crushed clove of garlic

Preheat oven to 200 degrees F. Place a baking sheet on the middle rack.

Trim ends off zucchini and grate them either on the large holes of a box grater or, if you have one, using the coarser shredding blade of a food processor (that is, if you have more than one shredding blade; mine has two).

In a large bowl, toss zucchini with 1 teaspoon coarse salt and set aside for 10 minutes. Wring out the zucchini in one of the following ways: pressing it against the holes of a colander with a wooden spoon to extract the water, squeezing out small handfuls at a time, or wrapping it up in a clean dishtowel or piece of cheese cloth and wringing away (the dish towel is my preferred method). You’ll be shocked by the amount of liquid you’ll lose, but this is a good thing as it will save the fritters from sogginess.

Return deflated mass of zucchini shreds to bowl. Taste and if you think it could benefit from more salt (most is lost in the water), add a little bit more; we found 1/4 teaspoon more just right. Stir in scallions, egg and some freshly ground black pepper. In a small dish, stir together flour and baking powder, then stir the mixture into the zucchini batter.

In a large heavy skillet—cast iron is ideal—heat 2 tablespoons of oil over medium-high heat until shimmering. Drop small bunches of the zucchini mixture onto the skillet (I used a #30 cookie dough scoop) a few at a time so they don’t become crowded (I did four at a time in a 10” skillet) and lightly nudge them flatter with the back of your spatula.

Cook the fritters until the edges underneath are golden, about 3 to 4 minutes. If you find this happening too quickly, reduce the heat to medium. Flip the fritters and fry them on the other side until browned underneath again, about 2 to 3 minutes more. Drain briefly on paper towels then transfer to baking sheet in the warm oven until needed. Repeat process with remaining batter, keeping the pan well-oiled. It’s best for the fritters to have at least 10 minutes in the oven to finish setting and getting extra crisp.

For the topping, if using, stir together the sour cream or yogurt, lemon juice, zest, salt and garlic and adjust the flavors to your taste. Dollop on each fritter before serving. These fritters are also delicious with a poached or fried egg on top.

Do ahead: These fritters keep well, either chilled in the fridge for the better part of a week or frozen in a well-sealed package for months. When you’re ready to use them, simply spread them out on a tray in a 325 degree F. oven until they’re hot and crisp again.

No-Knead Cinnamon Chip Bread

Bread
We recently hosted our friends Lori & Scott at the cabin for a fall color weekend, which was a great time and the leaves were gorgeous! Preparation for cabin trips is especially fun for me because it involves cooking and baking in advance so we have more time to get outside and enjoy the great outdoors once we’re there.

This trip, to go with our hearty cabin breakfasts, I made cinnamon chip bread with homemade cinnamon chips. Having made the cinnamon chips several times before (great in muffins and cookies!), I knew they would be good, but it was a first time for this bread recipe, which is adapted from one I got years ago from baker extraordinaire, Renee Saxman, a friend from my running days in Rochester.

A “Renee” recipe is always delicious when made by Renee. I just wasn’t sure if it would be as good when made by me. Hesitant to serve this untested to friends, I decided to cut off one slice of the finished bread to make sure it was “company-worthy.” Long story short, it was so good that Pete and I polished off the entire loaf. Fortunately, there was plenty of time to make another loaf and pop it in the freezer until the trip.

Why, you may ask, make homemade cinnamon chips when you can buy a good-tasting package at the grocery store? Most grocery store versions (Hershey’s, I’m talking to you) have some sketchy ingredients like partially hydrogenated vegetable oil, artificial colors, and natural & artificial flavors (but no mention of the word cinnamon—can you believe it?), so making my own was an easy choice. The King Arthur Flour brand, which has more natural ingredients, can be ordered online, but I’ve never seen it in stores.

The cinnamon chips are quick to make and once cooled and broken into pieces, will keep for several days in a covered container at room temperature. If you make them rather than using store-bought, you’ll be happy you did, plus, it will give you super-baker cred!
Home-made Cinnamon Chips

This is a perfect autumn and winter bread. Slightly sweet, with a crunch of cinnamon sugar on top, it’s delightful toasted or not. A little butter or jam, maybe peanut butter even, make for comfort-food bliss, and it’s a wonderful addition to breakfast—either at the cabin or at home. Enjoy!
Cinnamon Chip Bread

No-Knead Cinnamon Chip Bread

2 cups all-purpose or bread flour

1 cup whole wheat flour

½ cup sugar

2 teaspoons instant yeast

1 teaspoon ground cinnamon

1 teaspoon salt

1 cup warm milk (105-115 degrees F.)

¼ cup butter, melted

1 large egg

1 teaspoon pure vanilla extract

1 teaspoon baking powder

1 cup cinnamon chips (recipe follows)

Cinnamon sugar for topping (1/8 cup organic sugar mixed with ½ tablespoon cinnamon)

In a large bowl, whisk together the flours, sugar, yeast, cinnamon and salt. In a separate bowl, whisk together the milk, butter, egg, and vanilla. Combine the wet and dry ingredients, and mix until smooth (I used a stand mixer, which works better than a hand mixer).

Cover the bowl and let rise at room temperature for about an hour. Stir in the baking powder and cinnamon chips.

Scrape batter into a greased 8 ½ x 4 ½ inch loaf pan. Sprinkle the top with cinnamon sugar (you probably won’t use it all). Bake at 350 degrees F. for 45-50 minutes (it should read 200 degrees on an instant read thermometer when done).

Cool in the pan for about 5 minutes, then transfer from pan to a wire rack to cool completely. This freezes well, so is ideal to make ahead. Makes 1 loaf.

Cinnamon Chips
From this All Recipes post

1/3 cup sugar

2 teaspoons ground cinnamon

1 tablespoon non-hydrogenated shortening (I used Spectrum Organic Shortening)

1 tablespoon light corn syrup

Pre-heat oven to 275 degrees F. Mix together all ingredients in a medium bowl to form a dough. Between two sheets of parchment paper, roll dough to 1/8-1/4 inch thick. Transfer to a baking sheet and remove top layer of parchment. Bake for about 20-25 minutes, until bubbly.

Transfer, on parchment, to a wire rack and cool completely. Break into pieces. Makes about 1 cup.